Moms are always on the run and sometimes it is not easy to stay stylish when you have your kids running around asking for the same thing for the tenth time. However, take some time to sort your wardrobe out and find the jeans that you don’t wear anymore and give them a new opportunity to shine. I’m in love with Denim so DIY jeans were right up my alley. Making DIY mom jeans it not only easy but also super fun!
Understanding Different Jeans Styles
There are a lot of different styles of jeans out there and it’s important to have a good understanding of what look you’re going for. There are many types of jeans, including but not limited to, Straight, Slim, Skinny, Boyfriend, Loose, Flared, Bootcut, Wide, Distressed and Mom styles. Each has its own uniqueness and might be suited best towards someone of a certain age or “look”. Check this helpful graphic below to decide which style is best for you.
View in gallery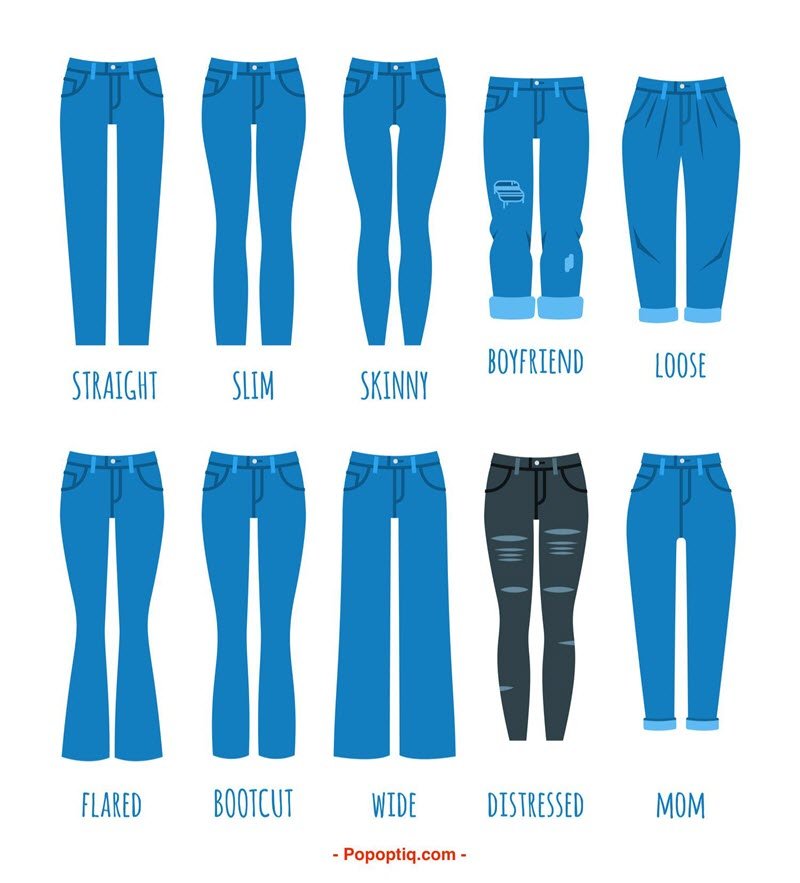
Making Ripped Mom Jeans
Ripped skinny jeans are still very popular, so instead of throwing a ton of money on buying some designer jeans, you can do that at home. There are lots of video walkthroughs to help guide you through the process. Here is a great video we thought was especially helpful.
Supplies You’ll Need For Skinny/Ripped Jeans
Besides the jeans, you will need a marker, pen, pencil or chalk to draw the line where you want the cut to be. Chalk may be the best choice because it can be easily erased if you make a mistake, but if you don’t have it, you can use any of these. Also, you will need a pumice stone sandpaper, steel wool or a cheese grater for making frayed looking jeans. Prepare a pair of scissors or a razor for cutting. Even a sharp knife will do, but only if you are skilled enough with it. Make sure you have everything prepared and do it when you are not in the hurry. The good news is that it won’t take too much of your time. Sit comfortably and place the jeans on the table, with all the necessities prepared next to it.
Important DIY Jean Tips
If you are not sure where you should rip the jeans, put them on and take the marker to draw the lines where you want to rip them. Keep in mind that it is better to rip them a little above the knee so that the distressing can be exactly on the knee and not below it. This way it will look stylish and trendy instead of baggy and messy.
Pay close attention to details and take your time, because in order to do it right you should do it slowly and carefully. Take the jeans and carefully fold the fabric in half where you draw the line and then start cutting carefully. Make a small hole and then cut along the line towards the inseam. Make sure you don’t cut all the way next to the inseam because the tearing will continue when you start wearing them, so leave some small uncut part.
Take the scissors and glide them over the part where you cut so you can make an even better effect of a distressed look. Take the pumice stone, cheese grater or steel wool and put a piece of the wood or anything else that you don’t need any more inside the legging. If you forget to put something inside, press the jeans down and start working on it, you may damage the bottom layer as well. This certainly won’t look good, so keep it in mind. After you have secured the bottom layer, start using the tool of your choice gently on the fabric so it gets a little worn-out look. This effect looks better on the light-colored jeans than on the dark jeans, so try first with some jeans that had their share of washing so far.
Steps for loosening the fabric
If you don’t want to have a clean cut, but to have fabric loosened, you need to fray the area or gently use the razor to create small incisions into the fabric. For a more discrete look, you can draw a few lines, use a pumice stone over it to make the effect a little bit more visible. This way, when you bend your knee, your skin will show a little, but not too much.
Of course, it is totally up to you what kind of look you want to achieve. For a more daring look, take the white fabrics out carefully and create bigger tears. This way, you will show more skin which can be particularly practical and beautiful during hot, summer days. Rip the jeans with your fingers, rather than with tools, because it will help you control the tears easier.
If you want to prevent further tearing once you are done, you can sew around the hole. Use the thread that will fit in the color of the jeans. Do it by hand or use a machine if you have it. However, if you don’t mind letting your jeans rip further, you can skip this step.
As you can see, it is really easy to make fashionable jeans and don’t break the bank. Fashionable doesn’t have to mean expensive. With a little skill, you can do it yourself and with very little cost or trouble. Play with your creativity and wear your jeans proudly, showing off your resourcefulness to friends and family!